How to Use Git (via SourceTree) with an Existing Unity Project
I've found myself having to help people through this a few times at game jams and other projects so I'm trying to write it up for future 😛
This article is for non-programmers who need to work with an existing Unity project and don't need to get too deep into the Git world.
It assumes that a Unity project already exists and has a Git repository that you want to work with, managed by someone with more Git experience.
These topics will be covered:
- Git Basics
- Installation
- Cloning and Running the Project
- A Simple Workflow
- Be Careful for Merge Conflicts
Git Basics
I won't pretend I'm the best writer for this kind of stuff 😛 Here's a hyper-focused list of things to watch/read about it:
- What is Git? Explained in 2 Minutes! by Programming with Mosh gives a good high-level explanation of why something like Git is useful
-
Git Explained in 100 Seconds by Fireship gives a short explanation of how it works. Additionally note the following:
- The branching and merging parts are out of scope for this guide so don't worry if it seems difficult
- Something that is in scope but wasn't covered is that your commits will only live on your computer until you
pushit to a server. Then collaborators need tofetchorpullthose commits down to their local repositories
- The "What's the difference between Git, GitHub (and others)" section of Git For Misfits (and artists) by Lee Tusman (although it's a good read overall if you'd like)
Something to add to that last point is the existence of Git Clients. The official Git software can be prohibitively hard to use for many, as it's a command-line tool without a graphical interface.
Other Git clients can be installed, many of which include graphical interfaces, to make Git's underlying functionality more accessible. In this post I'll be talking about using SourceTree.
Installation
Git and SourceTree:
-
Follow the prompts on the Git for Windows website to download and start installing Git
- All of the default values are fine for installation so you can click next next next next if you like
- If you are changing some things, make sure you keep the "Git from the command line and also from 3rd-party software" option selected in the "Adjusting your PATH environment" section
-
Follow the prompts on the official SourceTree website to download and start installing the Git client
- Note that you can skip the Atlassian sign-in step!
- It'll ask for your name and email address at some point. You should use the same values here as what you use for your GitHub/GitLab/other account
- The other default values seem to be fine so you can click ok ok ok if you like
Unity:
- Download and install Unity Hub
-
You'll need to sign into Unity and activate a license to use it:
- Click the profile icon to the top-left to login / create a new account
- Press the cog to open Preferences if it's not already open, and select the Licenses tab
- Press Add, Get a free personal license, Accept (assuming you meet the criteria!)
- Close Preferences
- Ask the team what Unity version is being used for this project
-
Find the correct version in the Unity Download Archive and press the button to download via Unity Hub
- You should be fine to untick all of the modules to install, but you might want to confirm with someone else on the team
Cloning and Running the Project
For this exercise we'll assume the Git repository is being hosted on GitHub, and that you already have a GitHub account with permission to access the project.
- Open SourceTree
- File > Clone / New
- Enter the project's GitHub URL into the Source Path / URL field, e.g. https://github.com/doodad-games/unitower
- A popup should appear prompting you to login to GitHub. Do it and approve OAuth access
- Click the Browse button besides Destination Path and specify where on your computer you'd like your copy of the project to reside
- Click Clone and wait
- Once cloned, the view should change to show you the repository's history or something along those lines
- If a popup mentioning Git LFS appears, check the "Don't ask me again" box and click Yes to download anything that's missing
You should now have a complete copy of the project on your computer. To run it in Unity:
- Open Unity Hub
- Open the Projects tab
- Click the Open button and select the folder you just cloned
You should be good to run the project in Unity! Note that the first load will likely take a long time.
A Simple Workflow
Now the project's running, but how do you actually go about working, sending your changes to others, and getting others' changes running on your PC?
- Pull (
A) at the beginning of a working session - Be careful not to change files that other people on the team may also be working on. Chat and coordinate as needed
- Work work work
- If you're going to stop and start again later, be sure to pull (
A) again when each new working session begins! -
When your work is ready to be shared with the team:
-
In Unity, press File > Save project
- This is different to the standard save hotkey which saves the currently open scene or prefab
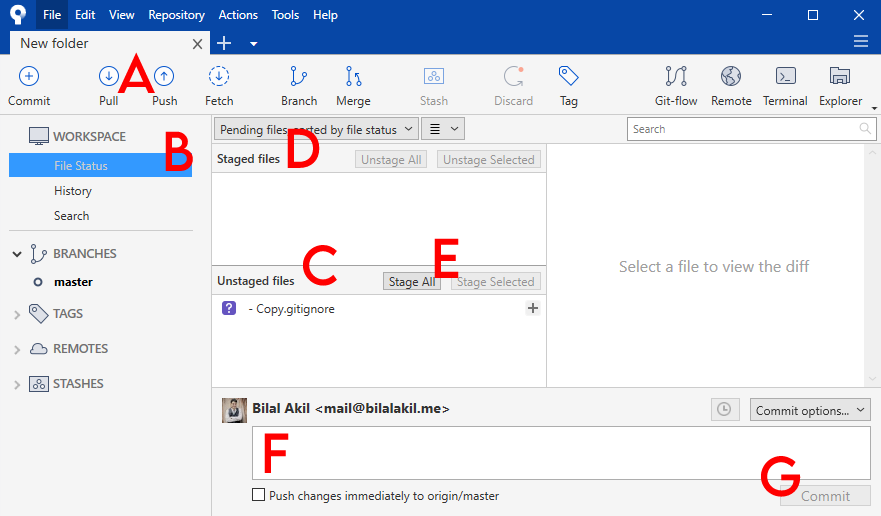
- In SourceTree, pull (
A) again - Go to File Status (
B) - Review the files shown under Unstaged files (
C) and Staged files (D). If there's anything showing up as changed that you don't think should be, consult with the team - When the changes look good, press Stage All (
E) - Write a very short description noting the nature of the staged changes (
F), e.g. "Added FMOD plugin"; "New menu track"; "Various gameplay rebalances" - Press Commit (
G) and then Push (A)
-
In Unity, press File > Save project
- Let the team know you just pushed
- Repeat
This recommendation can work with multiple people on a team exercising it simultaneously, but it entirely depends on the fact that people aren't working on the same files at the same time.
Be Careful for Merge Conflicts
Git supports multiple people editing the same file through its merge functionality, but it requires deeper Git knowledge to be used safely. That's why the suggested simple workflow depends on completely avoiding this scenario.
When two files are modified and Git doesn't know how to automatically merge them, merge conflicts arise and need to be resolved. Depending on the file type, this may mean someone needs to revert their work to accept someone else's version, and then redo theirs on top of it.
If a merge conflict arises you should probably consult the person who set up your Git repo instead of trying to resolve it yourself, because you may write over or destroy someone else's or your own work if you're not sure about what you're doing.
Unity projects are prone to merge conflicts, so the project needs to be well organised to avoid them. Scenes, prefabs, animations, images, etc., all cannot be auto-merged, so if two people change them then someone's work will need to reverted.
I apply these organisation strategies to try and minimise the chance of merge conflicts in my recent Unity projects:
- Scenes contain a couple of high level prefabs and nothing else. Thus scenes are hardly being modified at all - instead their prefabs are. e.g. a Dungeon scene only contains two prefabs: DungeonMap and GameFramework
- High level prefabs are further broken down to contain multiple smaller prefabs. Most changes will occur in the smaller, more specific prefabs, which are more focused and less likely to have merge conflicts occur. e.g. GameFramework contains the GameplayUI, SaveLoadSystem, TutorialSystem, and NotificationSystem prefabs. Any UI changes will only affect that one GameplayUI prefab - not the entire GameplayFramework - so one person can work on the UI while someone else works on the tutorial, for example
-
Always be careful that you're actually modifying the intended prefab, instead of specifying overrides to that prefab on a higher level prefab or the scene itself
- The easiest way to be sure that you're directly modifying the prefab is by always double-clicking its file in the Project tab to make sure it's loaded instead of the scene or something else
- This is also why you should check the list of modified files before committing and pushing: it's your chance to catch out accidentally modified files like this and avoid merge conflicts
-
Different disciplines have clear "boundaries" in terms of files/folders to do their work in. e.g. Assets/Visual, Assets/Audio, Assets/Gameplay, Assets/UI, Assets/Game Design, etc...
- Each team member is designated one of these directories to work within
- They should be very careful if they need to modify something outside of their designated directory. Communicate with the member of the team who's been designated to that directory to coordinate
- If multiple team members are designated the same directory, there should be ongoing coordination among them to avoid merge conflicts
- The programmer needs to figure out how to link the assets from the different disciplines together in a way that avoids merge conflicts
Hopefully this was helpful 🙂 But be sure to consult the person who set up your git repository before assuming any workflow suggested here is suitable for your particular project.